Wildlife Photography at Home
Extract taken from Wildlife Photography at Home by Richard Peters
There is something intensely satisfying about being in the presence of wildlife. I often think of my camera viewfinder as a private window into another world, a world that is entirely overlooked by many people as they rush around without pause for thought or taking time to sit back and absorb the nature around them.

Peering in through this private window is addictive, and I enjoy travelling to get my fix. From the frozen valleys of Yellowstone National Park to the sun-scorched plains of the Maasai Mara, there’s no doubt that spending time in such destinations is both exhilarating and inspiring. However, there is somewhere else that can be just as inspirational as these far-flung exotic locations. And this somewhere is very accessible and free to visit. I am, of course, talking about our very own gardens and backyards.
With the human population increasing and cities encroaching on the countryside more and more, urban areas have developed wildlife populations of their own and people have become incredibly welcoming towards them. We encourage wildlife into our yards by offering supplementary sources of food, providing fresh water and nest boxes, and generally creating inviting environments that animals will thrive in.
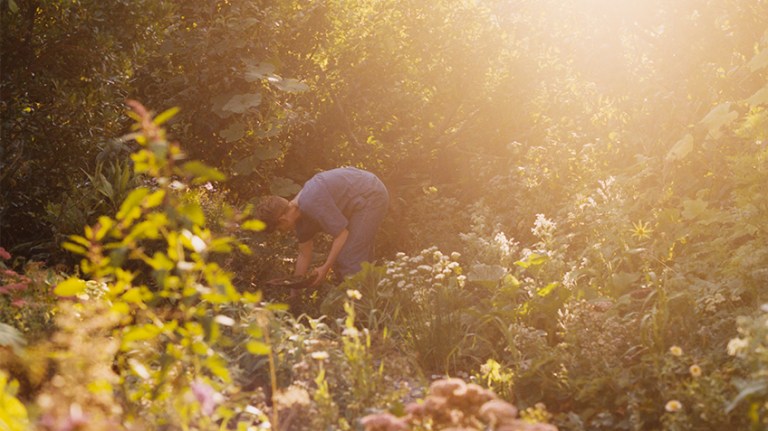
Your yard might not seem like the most inspiring of locations at first glance, especially if you are looking out the window at a desolate space in the dead of winter. I guarantee you, though, there will be something out there to photograph.
My yard, for example, isn’t particularly large, it’s a little rough around the edges and seems to get very few of the usual garden birds one might expect. However, in time, I discovered it wasn’t the wildlife wasteland it first appeared to be, and I’m willing to bet the same can be said for yours too. Sometimes it just takes a fresh perspective to provide motivation.
With that in mind, I wrote this book to inspire you to spend more time thinking creatively at home, to see what can be achieved in your own private nature reserve.
The following pages assume some knowledge of the basic relationship between shutter speed, aperture and ISO, but whether you are a beginner or a more advanced photographer, there is something for everyone. All images presented were taken at my home, and I hope that they will inspire you to go wild with your own camera in your own backyard.
BASIC PRINCIPLES
Master the fundamentals and everything else will fall into place
Before delving into any wildlife photography, be it a long-term project or just a few hours here and there, the single most important piece of advice that can be given, regardless of subject or location, is that perseverance is key.
Wildlife photography rarely grants instant success and gratification. Of course, there is instant gratification in that you can see your images on the back of the DSLR just as soon as you press the shutter. Here, however, we are talking more about the gratification of capturing a special image that stands head and shoulders above the rest. Such photos can, at times, feel out of reach, especially as it’s all too easy to look online at other photographer’s websites, Facebook pages and Instagram feeds, and when not a bad photo is to be seen, conclude that those photographers take only these special successful frames. It’s as if every image in their collection is an exercise in technical perfection, masterful composition and an amazing ability to seemingly always be in the right place at the right time. The truth is anything but this simple. What you are seeing are only the very best images they have taken, the images they want you to see. They aren’t showing you the thousands of badly framed, poorly lit, soft and mistimed photos. They have them, make no mistake, because we all do. Instead, what you are seeing is a culmination of time, effort and hard work. What you are seeing is the result of their perseverance.
The rules don’t change when you are working close to home. It’s important to understand that just because you have quick access to a location, it doesn’t mean you don’t have to work hard and put the effort in. What it does mean, however, is that putting that effort in is made somewhat easier with no time restrictions or financial burdens to potentially restrain you, as with other photographic endeavours.
As a very basic example, if you’re trying to photograph small, quick birds in flight around a feeder, you may start by working with large apertures such as ƒ/4, to allow in as much light as possible to keep your shutter speeds up. This requires working with a small depth of field, and capturing those fast little birds in the right pose with their heads in focus won’t be easy; it could take you thousands of frames to capture just one or two that are good. During that process, you will find yourself fine-tuning your approach, your settings and how and where to prefocus to achieve the perfect the shot. You then have that knowledge to use in future, should you want take a similar photo again. The hard work you put in initially will enable you to repeat the process with a much higher keeper rate in the future. On an even more basic level, you may find yourself wanting an image of your subject in the right place, and in the right type of light. Through months of observation, you may learn that that window is open for only a few weeks at a specific time of year. That’s the payoff of perseverance, and it’s what makes all of us better photographers. It’s a constant learning process, and it is thanks to going through the motions over and over that we are able to react quickly and make the most of any situation we might find ourselves in.
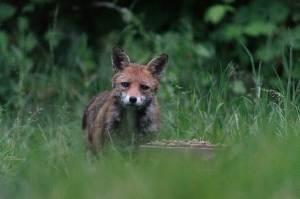
For me, especially in the early days, there have been times where I’ve been hugely frustrated trying to capture specific photos. In total, it took me three months to secure a single decent daylight portrait of the foxes visiting my garden, and it’s an opportunity that I didn’t get again after the first successful frame.
When the foxes stopped coming in daylight, I then had to learn an entirely new technique to photograph them. At the time, I had no idea about flash photography. There was a vast amount of trial and error, and I purchased much equipment that didn’t give the results desired. When I was just starting to understand the basics of flash, I also began to experiment with camera trapping, and a whole new set of lessons and complications needed to be learned and overcome.
Animals are unpredictable at the best of times. Over winter, when the yard went quiet for long periods, night after night, I would try to capture only specific preconceived frames. Some shots have taken weeks to find their way into my image library. For others, it has taken months.
My hope is to communicate to you the reality that, although it may seem like you’re the only one who can’t get the shot you so badly want, you’re not. If you find yourself close to perfecting that image you have been desperate to capture, but the process feels like nothing more than the repetition of failure, the worst thing to do at this stage is simply give up.
Never forget the importance of perseverance. Don’t rush yourself, keep learning from your mistakes, push through the frustration, and in time, your portfolio will reap the rewards.
VISUAL APPEAL
One of the key elements to producing an aesthetically pleasing wildlife photo is strong composition that complements the subject, balances the image and gives the viewer a clear point of interest. It makes no difference whether your subject fills the frame, is a tiny aspect of it, or is bathed in the most beautiful golden light; if the aesthetics are not there, the viewer won’t connect and the image becomes unmemorable. As you read through the following chapters, you’ll see how the featured photographs all fall in line one way or another with the basic theories explained in this section.
THE RULE OF THIRDS
You may already have heard the idea of the rule of thirds. It’s really quite simple: Imagine your image split into nine equal sections. When you place important elements at the intersections of those lines or along those lines, photos appear more balanced and visually pleasing.
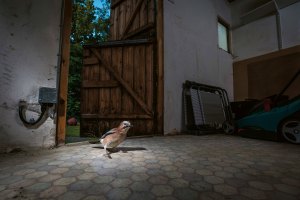
The rule of thirds and use of negative space can be observed here in their most simple forms. If the image were split into nine equal sections, the fly would be placed on a junction one third down and one third in. The empty space gives it room to move not just across but also down the frame, as its angle and position suggest it might do. This creates a basic well-balanced composition.
NEGATIVE SPACE
This refers to the empty areas in the image, but that’s not to necessarily say they don’t contain anything at all, as often they will. It is more that they do not contain key points of interest.
You can, however, use this space to place lesser elements that counter-balance the main subject. In the most traditional scenario, the function of negative space is to provide an area within the frame that the subject could move into. This frequently works hand in hand with the rule of thirds, because placing the subject in accordance with the rule of thirds often results in negative space elsewhere in the image.
Providing space for the subject also helps the image to feel larger than it is, giving the illusion of life
beyond the confines of the frame. A good tip to help with this is ensuring you do not use the centre focus point all the time, because that leads to a tendency to place your subject in the middle of the frame. Use the peripheral focus points from time to time.
EYE-LEVEL PERSPECTIVES
The third compositional lesson involves trying to get eye level with your subject, which often creates a stronger image and gives a more flattering perspective. Remember that whatever the angle, in almost all cases, achieving sharp eyes is critical for viewer connection. On this page, we show the same subject photographed from the same distance, at three heights, using an aperture of ƒ/5.
FILLING THE FRAME
While it’s always tempting to present the subject as large as possible, at times it is worth leaving some room around the frame. With a traditional portrait, there is a fine line between that space being just right and too much. If the subject dominates too much, it can make the frame feel cramped. If you leave some breathing room, however, you have the option of cropping a little tighter later if that works better.
Another incentive to leave some room and not overfill the frame is that it makes your photos commercially more appealing. If you sell, or plan to sell, your images, leaving some space gives the option for a client to add text or logos alongside the subject.
BACKGROUNDS & DISTRACTIONS
When opting for a simple portrait, in addition to getting the light and composition right, the background is critical in making the image work. A beautiful, clean background will help the subject to pop from the frame, so it’s important to keep an eye on everything you can see in the viewfinder. It’s all too easy to be totally absorbed by the close-up view of your subject that a telephoto lens offers; and that small viewfinder you’ll be looking through makes it easy to overlook distracting, out-of-focus objects that will stand out like a sore thumb when viewed larger on your computer screen.
There is nothing more frustrating than a portrait in which your subject is captured beautifully, but your eye is instead drawn to something behind that breaks an otherwise clean background. Yards are potentially littered with such distractions and you’d be surprised how a contrasting colour will stand out, no matter how far away it is. Holes in the hedge that allow brighter areas of light to come through, the dark trunk of a distant tree or even a pair of socks hanging on the washing line can spoil an otherwise perfect shot. Sometimes just moving a fraction to the left, right, up or down is all it takes to remove these distractions and clean up those backgrounds, shifting the viewer’s attention back to the subject.
More tips and stunning photographic examples in Wildlife Photography at Home by Richard Peters