Modern Embroidery Project
GETTING STARTED
TOOLS AND MATERIALS
One of the many wonderful things about embroidery is how accessible it is—it doesn’t require much in the way of investment.
You can procure the supplies you need to get started for a very small cost and they don’t take up a lot of space; you can usually keep everything you need for an embroidery project in a small bag.
For many of us modern, on-the-go people, these are just some of the reasons embroidery is such an appealing hobby.
As with any art form, you can invest in extra tools or purchase the fanciest materials, but I recommend embarking on your embroidery journey armed only with what you really need and with what works best. Choosing low-cost but quality, functional materials will set you up to be successful with your stitching and, in turn, help you enjoy the process. After years of embroidery practice, what follows here are the things that I have found to be essential tools of the trade.
FABRIC
Whether you’re choosing to embark on a project that will remain framed in a hoop or one that will serve another function (think embellishing jeans or linen napkins), you’ll need a piece of fabric.
While you can embroider on any type of fabric, some are better suited to it than others. Light to mid-weight, non-stretchy fabrics with a tight weave are the easiest to stitch onto. I recommend choosing quilting cotton, linen, or linen-blend fabrics to start with. A scrap of old denim can also serve as a nice background for embroidery, as well as cotton canvas, twill, lightweight wool, or even velvet. Fabrics that stretch, such as jersey knit, can be really tricky to work with, because they don’t hold their shape well enough to remain taut in an embroidery hoop.
Keep in mind that transferring your pattern design to thick or dark fabrics can be more complicated than transferring to a light-weight and light-coloUred fabric (more on that later on).
I generally like to opt for solid-coloUred fabrics, as I feel it helps the embroidered design stand out and look its best. However, patterned fabrics can be fun to stitch on as well. If you choose a patterned fabric, be sure that the pattern is subtle enough to complement your stitches instead of competing with them for attention. If you want to move beyond solid coloUrs but are wary of a bold, patterned fabric, try going for something with subtle speckles or another small design motif.
THREAD
I used DMC brand cotton embroidery floss for all of the projects shared in this book. Basic cotton embroidery floss is composed of six thin strands of thread, gently twisted together. These strands can be used as a whole or separated into any thickness (many patterns in this book call for just three strands, for example). DMC has an excellent range of coloUrs to choose from, is high quality, and doesn’t bleed when it gets wet, which is important if you’ve used a water-soluble transfer ink or stabiliSer. That being said, there are many other types of fibre out there for stitching. Silk or satin threads can create beautiful luster in your projects and thin yarns spun with cotton or wool can add excellent texture. I encourage you to use whatever type of fibre appeals to you and experiment to see what results come from using different materials.
You can choose to store your thread on the skein as it comes, wind it onto bobbins, wrap it into thread circles or bows, or even wrap it around clothespins. Finding an efficient way to store your thread will help to keep it organised and untangled.
NEEDLES
When choosing a needle for your embroidery project, consider these three things: fabric thickness, thread thickness, and personal preference. In general, thick fabrics, or fabrics that have a very tight weave, require a sharp needle. When stitching on cotton twill or canvas I use a needle with a sharper point than I do when I’m stitching on basic quilting cotton or linen. Embroidery needles have sharp points and are suitable for thicker and finer fabrics, whereas tapestry needles have duller points and are useful for fabrics that have a looser weave. Choose a needle with an eye that is large enough to accommodate the thickness of your fiber. If you’re using the full six strands of embroidery floss, you’ll need a needle with an eye that all six strands can fit through without frustration—tapestry and embroidery needles both have long eyes and are good options. Lastly, it comes down to what you feel most comfortable with. As a mom of little ones, I generally prefer to use a dull needle if I can. The benefits are two-fold. The dull point allows me to slide my needle along the back of my fabric until I locate my insertion point, without snagging the fabric. Additionally, if I drop a needle on the floor or into the couch (believe me, it happens)
it’s less likely to injure anyone before I recover it. My personal favourite needle to work with is a size 22 tapestry needle. The higher the needle’s number, the shorter and thinner it is. Find what tool works best for you and invest in at least two. It’s never fun to stall on a project because of a misplaced needle.
HOOPS
There are many different sizes and types of embroidery hoops to choose from, and these differ depending on where you live. Some regions of the world mainly have hoops with screws that tighten at the top, while in other areas you can find only spring-tension hoops. Some hoops are made of wood, some of metal, and some of plastic.
PROJECT

SUPPLIES
• Basic sewing kit
• Round embroidery hoop, size 5” (12.5cm)
• Fabric of your choice, at least 8 x 8” (20 x 20cm)
THREADS
1 skein of each thread colours of your choice
TECHNIQUES
• Satin stitch
• Stitch tucking
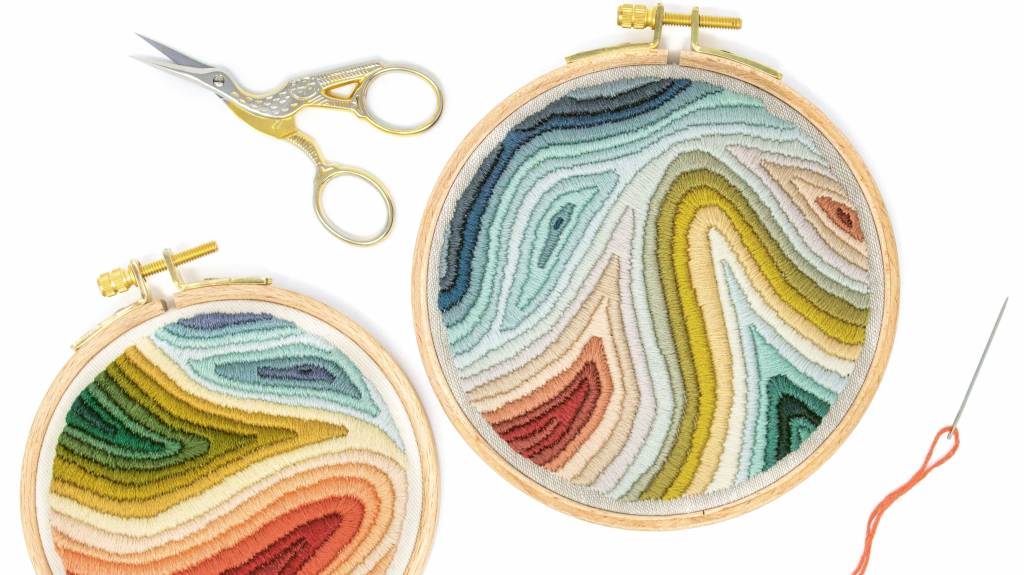
Satin Stitch
Satin stitch is a fill stitch where several stitches are placed alongside one another, creating a smooth, satiny texture.
How to: Bring the needle up through the fabric at A and reinsert at B.
Bring the needle up at C and reinsert it at D. Bring it up at E and back
down at F. Place each new stitch very close to the previous stitch—there should be no visible space between stitches. Satin stitch should look the same on the back of your fabric as it does on the front
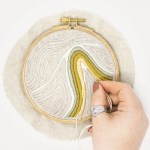
STEP 1
Transfer the design to the fabric and prepare your hoop. Use six strands of thread throughout this design, and refer to the diagrams on page 51. Fill the longest, central band with satin stitch. I recommend beginning in the centre of the band and working outward toward each edge in turn. Continue adding stitches until your needle bumps up against the edge of the inner hoop.
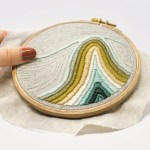
STEP 2
Continue using satin stitch to fill in each consecutive band with a new colour, ensuring that each additional band of colour is as close as possible to the previous band— sharing the same holes in the fabric wherever possible.
STEP 3
Pay close attention to the shape of each new band. When you come to a band that is pointed, begin stitching from the point, stretching your stitches horizontally across the area and splitting into two sections as indicated. This keeps all of your stitches in the same direction instead of angling stitches around such a tight curve.
STEP 4
Work through each main section of the design before moving on to the next. I began by filling section 1, followed by section 2A, then 2B, and finished with section 3.
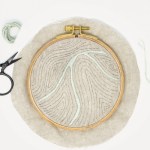
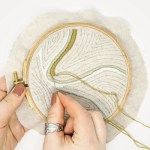
Stitch Tucking
When you encounter a leaf that curves strongly to one side, the outside edge of the leaf’s curve will be a longer line than the edge on the inside of the curve. Since you’re alternating your stitches from side to side in leaf stitch, you’ll run into problems because the long side will require more stitches than the shorter side. By tucking some stitches on the longer side under existing stitches, you can give this side the added thread it needs while avoiding bulky thread build-up.
How to: Begin stitching as you would any leaf. After your first three to four stitches, return to the longer side of the leaf, bringing your needle up through A and reinserting it into the fabric at B, which lies just underneath the previous stitch on that side of the leaf, about three quarters of the way to the centre line; this is tucking a stitch. Before alternating to the opposite side of the leaf, place an additional stitch on this side by bringing your needle up through the fabric at C and reinserting it at D, on the centre line of the leaf. Now alternate to the other side of the leaf, bringing your needle up at E and down at F. Repeat this process by returning to the longer edge of the leaf, tucking a stitch just as before, creating an additional full-length stitch on that same side, and then alternating back to the shorter side of the leaf and adding one regular stitch. Continue this process until you work past the very curved portion of the leaf, then return to alternating stitches 1:1 on both sides of the leaf.
Extracted from The Modern Embroidery Workshop by Lauren Holton